Friday, December 29, 2006

Must Have Equipment for Shooting a Film/Video

For shooting a digital film, you will need the following equipment on your location or sets:

  • Camcorder.
  • Power Supplies. Batteries or main connection cables.
  • Video Tapes. Take four or five for a day's work, although it is unlikely that you will complete this much of shooting.
  • Camera Support. Take a Tripod and other camera accesories as required.
  • Microphones. A boom or shotgun mic should cover most situations, but take a unidirectional cardioid mic as well if you have one. A lavalier, clip-on mic will help with close-ups, or if you want to exclude other noises when recording dialogue.
  • Lights. If you only have one lamp, make sure its a powerful keylight such as a Redhead.
  • Monitor. If you want to be sure that the film you are shooting maintains the highest technical standards throughout, consider using a monitor, a small television hooked up to show what you are recording.

You can of course, carry a lot more stuff four your shooting according to your requirements. The things I have mentioned above are only the basic shooting equipment required.

Wednesday, December 27, 2006

Filming in Cold Weather

Its getting quite chilly, and I hope you're feeling the chill too, especially those in the Northern hemisphere. Why not discuss about filming in cold weather.

When using your camcorder in winter or high altitudes where it is cold, remember that the efficiencies of batteries falls considerably at sub-zero temperatures. You should therefore carry spares with you at all times when the weather is cold and, in addition, carry them in your inside pocket where your body will keep them warm. If you aren't going to be filming for sometime, take the batteries out of the camera and put them in an inside pocket, too. Its not a bad idea to invest in an insulated carrying case for your camera batteries if you intend to film in such cold weather.
Hopefully, this will help you get superior shots from your camera.

Monday, December 25, 2006

Film Editing Software: An Overview

Film Editing Software generally follow one of two metaphors: the user-friendly video workshop or the all-inclusive movie factory. Programs in the first category, like iMovie, appeal to newcomers because they’re limited in functionality and avoid complexity at every turn. These straight forward tools usually feature drag-and–drop icons and present large buttons as a way to select a desired effect. They hide their power behind a façade of simplicity. Designed to remove any intimidation from the filmmaking process, most such interfaces succeed in making editing a fun and stress-free experience.

Other video editing applications, like Adobe Premiere and Apple Final Cut Pro, hail from a long line of professional 
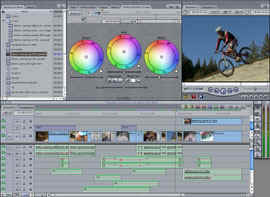
non-linear editing systems and a legacy of broadcast techniques. Their development has been years in coming, and along the way their feature sets have been both streamlined and enhanced to give editors greater control and flexibility—at the cost of complexity. These environments are not immediately intuitive (in fact, novices may find them a bit daunting); however, they do allow users to fine-tune almost every aspect of digital production. You can alter the colors of clips, the behavior of text, and almost every variable of your special effects and transitions. However, in the process the interface often becomes convoluted with cascading windows, tiny buttons and sliders, and submenus that can easily overwhelm the casual user. Making matters even more confusing, several of these popular programs have recently added compositing modules and special effects controls—both previously the exclusive domain of separate applications.


This movement toward all-in-one editors has created some two-headed monsters: programs that can do it all but demand tremendous processing power and substantial computer memory. Many of these applications also depend on the use of third-party plug-ins to extend their capabilities, which has made managing software and hardware configurations a complicated prospect.

Final Cut Pro
, for example, is a professional package with an extensive set of special effect filters and titling controls, but it doesn’t run efficiently on any Macintosh model with less than 450 Mhz speed and at least 256 Mb of RAM. Nevertheless, the software quickly made inroads in the broadcasting world because it followed many of the conventions of established editing programs and incorporated titling and composting functions previously found only in separate, stand-alone applications.


Avid’s Xpress is another example of a high-end film editing application. This software was once the industry darling, dominating most high-end post-production facilities. Until recently, the software was only available bundled with a souped-up system, completed by some proprietary enhancements. However, today’s computers can finally meet the demands of this award-winning digital video editing interface, and the Xpress DV software is now sold independently of its hardware.

Both the simple and the complex film editing program can give the everyday computer user enough functionality to create short films of full features. Pick one, and you’ll likely never need another: That’s because those drawn to simplified interfaces tend to stay away from programs with more extensive capabilities. And those who choose more sophisticated applications invest so much time in training they’re unlikely to jump to a competing product.

Friday, December 22, 2006

Handling the Camcorder

Hand-held camerawork lends footage newfound mobility, interesting angles, and documentary style vitality to your video—all of which make handheld shots a favorite for extreme sports, live news coverage, and music videos.


Since holding a camera (even a lightweight model) can quickly bog down a camera operator, many of them use support devices and grip equipment. Although there are hundreds of choices on the market, almost any rig will ease the strain of carrying the camera on long takes. In the end, however, the best camera operators learn to stand still and reserve their jerky shooting techniques for the right moments.

There’s no need to shy away from hand-held shots: most of today’s consumer-level digital camcorders have excellent built-in stabilization technology to reduce unwanted jitters. Nor should you worry too much about using products like Steadicam and gyro-based supports to smooth out motion. Your lightweight DV camcorder can easily reproduce the handheld takes produced by this type of expensive “professional” equipment.avorite for extreme sports esting angles, and documentary style vitality to your video


Tripods, Jibs, and Dollies

Serious narrative filmmakers will find a sturdy tripod an essential part of their camera package. You should also research and invest in a fluid camera head for superior pan and tilt shots.

A number of home-based businesses sell collapsible jib and dolly rigs that give the look of a professional crane in motion. These tools can help you establish excellent tracking shots and complex movement that flows freely throughout the set but is more consistent than a Steadicam or handheld shot. DV footage benefits extensively from these tools because their rigid construction prevents your camcorder’s digital stabilization features from automatically interpolating frames to correct for sudden movement.

Digital Filmmaking

Wednesday, December 20, 2006

Cinematography - III

Camera Movement

Long takes usually involve camera movement of some sort, as it would be difficult to justify a long take in which the camera was static, unless the action within the frame was sufficiently interesting to be able to hold our attention. There are four main types of camera movement: in a pan shot the camera rotates horizontally around a fixed position (often used to follow movement); a tilt shot moves the camera vertically around a fixed (typically used to indicate height); a tracking shot involves a horizontal movement of the camera in which it changes location, usually fitted to a device called a dolly that runs on rails; a crane shot enables the camera to be raised and lowered and moved horizontally. In addition to the above, it is also possible to use a hand-held camera or to utilize the zoom facility, which strictly speaking is not a camera movement but movement within the camera - repositioning the lens in relation to the aperture.

The problem with hand-held camerawork is that the shots can be unsteady, but the use of steadicam equipment can overcome this problem and provide smooth moving shots. The viewer is linked more directly to the person filming; first because we usually see exactly what he sees via the camera but also because we are reminded of their presence through the shaky camerawork.


Shot taking with a crane

Crane Shot
In Martin Scorsese’s opinion, one of the greatest shots of all time is a crane shot lasting more than a minute, used by Hitchcock in Young and Innocent (1927). In this film a murder has been committed and those investigating believe the culprit is in a ballroom; the only clue that they have is that the murderer has a facial twitch. Hitchcock gives the viewer information that the investigators don’t have with a crane shot that begins with an ELS of the ballroom, and then moves over the heads of the dancers towards the band on the stage, ending with an ECU of the drummer’s face, which begins to twitch.


A Jib on Tracks

Zoom and tracking shots
It will immediately be realized that a tracking shot is one way of bringing a subject closer by physically moving the camera nearer. However, another technique which produces a similar effect is that of a zoom, the main difference being that the camera does not physically move closer but the lens alters its focal length .But while both techniques bring the subject closer, they differ in how they deal with perspective concerning the relationship between shat is in the middle of the shot and what is at the edges of the frame.

Camera Angle

Camera angle provides another means of producing different meanings. Normally the camera angle is horizontal and at eye level: we usually communicate with each other at something approximating eye level and subconsciously expect to relate to the characters in films in the same way.

However, high and low camera angles can be used too. A high camera angle can be useful for providing a general overview of a situation. A low camera angle may be required because of the position of a character in relation to something else. High and low camera angles can also be used to represent a power relationship between characters in a film or to emphasize the subordinate or dominant nature of a character to the audience. An angled shot can also provide a distorted view.

Monday, December 18, 2006

Cinematography - II

Length of take


A still from Cinema Paradiso (1989)

If shot sizes tend to be large at the beginnings of films and scenes, an equivalent characteristic can be noted for shot duration of the length of a take. The average duration of a shot approximately 6 seconds, but introductory shots are often at least twice this length. Again, the pace tends to be slower in order to allow the viewer more time to become acquainted with characters and locations. If we look at 2 minutes from near the beginning of Cinema Paradiso (1989) we find only five shots. Within this time we are introduced to the main character Salvatore and his wife, who informs him that an old friend, Alfredo, has died. This leads into a flashback to his youth which goes on to provide his childhood memories, which constitute the bulk of the film. If we then look at a 2 minute period from the climactic section of the film, when Salvatore saves Alfredo from a fire in the village cinema, we find 52 shots. The narrative allows short takes because we know the location and characters well, and the narrative also requires short takes because the scene involves action and panic. Imagine the effect if we reversed the shot duration: 52 shots in 2 minutes to introduce characters and only five shots to cover 2 minutes of fast-moving action.

There can be other reasons for long takes in a film. Orson Welles famously and Jean Luc Goddard infamously, have used long takes. In Goddard’s Weekend (1968) one shot lasts 8 minutes and gradually reveals to us a long line of cars in a traffic jam. As well as also helping to ensure that the film is ‘alternative’, which was no doubt part of the director’s intention, the shot also helps make one of Goddard’s points about cultural life and consumerism in 1960s France-the point being that while the trend of going away for the weekend grew, it increasingly resulted in people spending the weekend in traffic jams


Welles began Touch of Evil (1953) with a shot lasts over 3 minutes. It begins with a close up of a bomb being planted in a car. The camera then rises to give us a bird’s eye view of the situation, including the car driving off. The camera tracks to catch up with the car, then drops down to enable us to hear a banal conversation between a border guard, a woman and a man. This technique builds suspense as we are expecting an explosion, which soon follows and brings the shot to a close. Being the exception to the rule begs the question, why use a long takes instead of editing together several shots covering the same action? It could be argued that in this instance we are given anoverview of what is happening in adjacent locations simultaneously as a way of providing us with the bigger picture. However, if this is the intention, then why is the technique not used more frequently?

Alternatively it could be argued that such a shot was motivated more by style than by the requirements of the narrative, which is not necessarily undesirable. For now it is sufficient to note that it is a technically impressive shot with incredible complex timing which has certainly gained a place within the study of film.

Having suggested that the long take at the beginning of Touch of Evil may be more to do with style than with content. It would be wrong to assume that this is always the case.

Depth of Field

Another aspect of cinematography is the depth of field. Depending on shutter speed, aperture and the amount of light available; a camera can focus on just a small part of what is in the frame or on the whole scene. Focusing on only part of a frame is known a shallow focus and is often used as a device for encouraging the audience to concentrate on a particular part of the scene. Conversely, seeing everything in focus, from foreground to background, is known as deep field photography or deep focus.rs its focal length.But while both techniques bring the subject closer, they diff

e us a bird'r, then drops down to enable us to hear a a close up of a bomb being planted in a car.ot is interesting ch is immediately transformed into an ECU as a c

Friday, December 15, 2006

Cinematography

As most of you must be aware, cinematography is concerned with recording the elements within the shot. While photography is the recording of a static image, cinematography is the recording of a moving image. In order to obtain the desired images, the cinematographer must attend to two areas: control of lighting and operation of the camera. The images consist of reflected light and the camera records light. Indeed, in Britain a cinematographer (the person responsible for lighting and camerawork) is sometimes known as the lighting cameraperson or as the director of photography.

Important Aspects of Cinematography

FRAMING
A key ingredient of cinematography is framing. This refers to the edges of a shot, in that framing determines both what is included and what is excluded. There is indeed a close link between framing, composition and mise en scene. Mise en scene refers to what is to be filmed and how it is arranged and therefore in effect defines what the framing will be; however, strictly speaking the framing is only realized when the shot is filmed through the camera lens.


In the Norman and Marion conevrsation scene from Alfred Hitchcock's Psycho, Hitchcock could have chosen to widen the framing so that we could se both Marion and Norman. However, this would have entailed including more height in the shot, which would perhaps have meant meaningless space and detail. The tighter framing chosen by Hitchcok means we get a mid shot of Norman's reactions as he speaks to Marion. Hitchcock nevertheless briefly gives us a long shot of both Marion and Norman at the beginning and end of the scene to provide us with a sense of spatial relationship between them.

SHOT SIZE
Shot size in turn is determined by the framing. There are many possible choices of shot but we can think in terms of five basic shot sizes with intermediate shots in between. Shot sizes can be closely tied to narrative development, notably to the progression of scenes. Typically a film, and often a scene, will begin with an extreme long shot (ELS). Just as narratives tend to begin slowly in order to acquaint us with characters and locations, so films visually use an ELS (sometimes called an establishing shot) to place things in context. An ELS allows us to see a subject in relation to her/his surroundings. Blade Runner begins with several ELSs which gradually introduce us to Los Angeles in the twenty-first century, followed by the introduction of themes and characters.

A film can begin with an extreme close up (ECU); this could be used to make us inquisitive, or it may simply be an impressive shot because of its content, but more often than not it won’t make much sense. The Good, the Bad and the Ugly (1967) famously begins with an ELS which is immediately transformed into an ECU as a character walks into shot and looks straight to camera. The shot is interesting and intriguing while also being disconcerting; however, it makes no obvious sense in the context of the film. It does not enable us to get to know the character in greater depth, which would arguably be a pointless exercise anyway as he dies a couple of minutes later. The choice of shot seems to be more to do with style and experimentation than with illustrating the narrative. Furthermore, having a character look straight to camera is usually identified as a technique of alternative cinema.A first close up is usually found some minutes into a film when we are already accustomed to characters and locations. Typically a CU will concentrate our attention on as important detail to ensure that the desired meaning is communicated, or else a CU will be used as a reaction shot to show someone’s response to an incident. It is common to find a CU of someone’s face when their expression tells us something or a CU on an object that is to have a crucial function in the film. Scream in fact begins with a potentially confusing shot, a CU of a telephone: however, we do hear a phone ringing and we don’t have to wait long for it to take on relevance. The camera tracks back to show Casey picking up the phone. These introductory shots are also soon followed by an exterior ELS (albeit a threatening one) of Casey’s home to provide us with the context.

I will continue with this topic in the next post, discussing other aspects of cinematography...

Wednesday, December 13, 2006

Problems in Hot Plugging Devices

Usually, when a camcorder is hot-plugged — or attached via FireWire cable to the computer, your editing application will automatically recognize the connection, making the video immediately ready for import. However, problems can arise - the following paragraphs cover some of the more common ones:


Some applications won’t recognize camcorders connected to a daisy chain — i.e., a string of linked FireWire devices. For example, Apple’s popular iMovie software cannot import footage from DV camcorders attached via daisy chain. Likewise, many applications will not support the simultaneous use of multiple devices connected to your computer with FireWire because of driver conflicts. Typically, an operating system will assign a FireWire port to a single application at the exclusion of all other devices; when the application is shut down, the port is released for other uses.

Although most computers with six-pin FireWire connection can supply adequate power to FireWire peripherals, this is often not the case with digital camcorders. DV cameras require their own electrical sources and must be turned on with their own batteries or AC adaptors before they are recognized by the computer and its applications. Unfortunately, the computer’s internal power supply cannot supply sufficient DC voltage to operate a camcorder.

Never unplug a FireWire cable in the middle of a capture session. Hot pluggable devices are a tremendous convenience to computer users, but disconnecting them while importing DV footage can create a variety of technical problems—computer crashes, disk errors, damaged footage, missing data, and dropped frames, to name just a few. Make sure to stop your camcorder or finish your data transfer before removing a FireWire cable.

Hope you got the point!

Monday, December 11, 2006

Why Does Your Footage Appear Blocky?


Once a computer has imported DV footage, it keeps the original source files on the hard disk and creates a series of preview frames to display in the video editing application (Avid, FCP Adobe Premiere...). These preview frames are created by removing much of the video and color information that NTSC televisions require, and simply displaying the frames as they will best appear on your computer monitor

Although these images will appear blocky, fuzzy, or more muted than those seen through the viewfinder of a camcorder, not to worry: These screen images are simply low-resolution stand-ins for the real footage. Once formatted, these preview frames will appear at full screen and full motion, and display much faster than the higher-resolution images of an uncompressed video stream.

Previews make the long and arduous task of editing infinitely more bearable by speeding the response time of video playback. Without these low-res substitutes, even the fastest computers would be unable to display motion pictures in real time. Meanwhile your full-quality original footage remains locked inside the clip by the DV codec until you’re ready to export your final movie in all its glory.

Related Posts: DV Shooting Tips

Thursday, December 07, 2006

Some Camera Acessories

Fisheye Lenses: An extreme example of a converter is the fisheye lens. Curved to a horizontal viewing angle of nearly 125 degrees, this attachment creates a high degree of barrel distortion, exaggerating the depth of scenes by pulling nearby objects closer and receding distant objects to the background. Used with lightweight digital cameras, this unique perspective often lends a sense of drama or excitement sporting events, action shots, and point of view footage from surveillance equipment.


Aquatic Housings: A number of companies design and manufacture water-proof aluminum housings for shooting video in undersea depths of up to 450 feet. Once you submerge a DV camera, however, you begin to lose proper light levels and esperience shifts in the color spectrum. For this reason many divers also use special aquatic lights, optics, and correction filters to increase color intensity and boost luminosity. Most water proof camera housing features mechanical controls that help you operate the camera functions without getting moisture into your camcorder.


Transvideo Handheld Prompter: The folks at TransVideo took their popular mattebox setup and replaced the heavy steel support rods with lightweight carbon equals, attached a 6-inch monitor to the front housing screws, and gave it some semi-reflective glass. The result is the versatile 4-pound Transvideo Handheld Prompter, ideal for crews using . Attached to a Canon XL-1, the entire system (monitor, prompter, and mattebox) weighs less than 13 pounds. Designed to work in full sunlight without a hood, the teleprompter allows the use of filters. The composite and VGA (60-Hz.) monitor can accept signals from any laptop and flip the image left, right, and upside down-necessary to view the mirrored text in the display glass. The Transvideo monitor can also be equipped with a wireless receiver and battery pack, making the same equipment useful as a client monitor on set.

Related Posts: Camcorder Lens Filters

Monday, December 04, 2006

Audio Tips for filmmakers

When you record audio, you’ll do well to keep in mind the following:


  • For large noisy sets, it’s best to use an external or wireless microphone to record dialogue. Remember: You want to record audio in the immediate proximity of actors, which means that if the camera is positioned far from the action, you’ll need to use remote microphone.

  • Plug headphones into the output jack on your camcorder and listen to the audio being recorded to determine if the levels are adequate. You should also be able to hear any interference or electrical hums that might not be noticeable without a headset.

  • Use the appropriate microphone. A lavaliere microphone is a clip-on recorder that should be placed at chest height on actors. A shotgun microphone can be used at a distance but you should always aim it at the primary speaker.
  • Always record several minutes of room tone—natural or ambient sounds of the quiet set at rest. This “clean noise” is frequently used in audio editing to fill long pauses in dialogue or to obscure annoying pops or hisses in the soundtrack.

If anyone has more audip tips they are most welcome to suggest it by commenting on this blog post. All other suggestions on digital filmmaking are most welcome.

Realted Posts: Use of Sound in Films

Saturday, December 02, 2006

Film Motion in Video Footage

Digital video footage borrows a filmic property through the use of shutter-speed controls, which change the rate at which fields are converted to frames, compacting the time between field sets and elongating the distance between actual frames. The slower the shutter speed, the more motion blur will occur in images. Thus, images captured at shutter speeds greater than 1/60th of a second show virtually no blur when projected, while those shot at 130th of a second will appear more like film.


You can also use a number of software plug-ins and applications (like Cinemotion and After Effects) to introduce motion blur into video footage to achieve a subtle amount of the movement typical of images projected on film. However, as in other digital post-production processes, your footage quality will deteriorate because of the interpolation of motion blur that occurs in such programs. For this reason, it’s better to rely on your camera’s built-in functionality to achieve these effects than to depend on the computer to fix wayward footage.

Tip

Check your camcorder for adjustments that slow down shutter speed, a digital effect that can reduce high-speed camera motion. If you feel compelled to use fast panning during your shoots, you can employ this feature to improve your compressed video

Related Posts: The Right Camera for Film Transfer