Showing posts with label video editing. Show all posts

Saturday, July 06, 2013

10 Free Video Editing Software for Filmmakers


Money is, by definition, 
always a difficult issue for the low budget filmmaker.  The challenge is in getting as much of your meagre budget up on the screen as possible. Luckily, by the wonders of open source development, just about every $800 software package has its freebie equivalent.

1. Lightworks

PC ( LINUX public beta released early 2013, MAC TBA)
An incredibly powerful editing package that is head and shoulders above all other freebie editing packages.  Just take a look at their website to see some of the high profile projects that have used Lightworks.  Lightworks has features that even some of the big packages don’t have without the addition of expensive plugins.  With a strong community supporting it, this is only going to get better.
Get Lightworks here

2. HyperEngine-AV – Equivalent to Adobe Premiere, Final Cut Pro

MAC/PC
A decent editing package.  A step up from the likes of imovie though still not up to the professional standards of the pricey packages.  For simple edits though, you could do a lot worse.
Get HyperEngine-AV here

3. Avidemux

MAC/PC/LINUX
One of the best free editing packages out there.  Avidemux allows you to do basic cutting, apply filters and work with a wide variety of different file types.  It gets better with each release.
Get Avidemux here

4. Windows movie maker, pinnacle videospin

PC
These lightweight freebie editors should not be overlooked entirely.  For quick edits and changes there’s no need for the big guns.
Get Windows Movie Maker
Get Pinnacle Videospin

5. Avid Free DV

MAC
This was a great idea but has sadly been discontinued by Avid.  Avid Free DV is a free version of their high end editing software, preserving the interface but removing many of the advanced features.  Great for simple editing whilst also learning your way around Avid.  Copies are still floating around online, though now it’s unsupported it is just going to get more out of date with time.  Get it while it’s still useful.
Get Avid Free DV here

6. MPEG Streamclip

MAC/PC
Another powerful, professional encoding and conversion tool.  It accepts even the most obscure video formats and can even download YouTube videos. It is widely used as a simple tool for transcoding unwieldly DSLR footage.
Get MPEG Streamclip here

7. ffmpeg

MAC/PC/LINUX
A powerful encoding tool that can read and convert just about any video file format.
Get ffmpeg here

8. DCP Builder – Equivalent to taking your project to an expensive post house

MAC/PC/LINUX
Want to screen your film at the utmost quality?  Modern digital projectors require something called a DCP (Digital Cinema Package).  Most post houses will charge you several thousands for the privilege, even for a short.  DCP Builder is free.
Get DCP Builder here

9. Open DCP

MAC/PC/LINUX
Another DCP package.  Personally I’ve had better results with this one than with DCP Builder.  But hey, they’re both free so give them both a shot and see what works best for you.
Get Open DCP here

10. Black Magic DaVinci Resolve Lite

MAC/PC/LINUX
A good colour correcting job can make your budget movie look a million dollars.  Black Magic now offer a lite version of their powerful colour correcting tool absolutely free!
Please feel free to add your own favourite free software that give an edge to the filmmaker.

Friday, January 11, 2013

Free stock footage, music from Video Blocks

Got an email yesterday about an upcoming company called Video Blocks that's offering free stock footage from their collection of over 50,000 video, motion backgrounds and production music - if you sign up for a 7-day trial.


The offer seemed really tempting so I did some research on Video Blocks and realized they were featured on TechCrunch too:


Anyhow, I still have to check them out. The 7-day trial offer is really tempting, the only catch is that they require your credit card info to complete the trial sign-up. This is so that if you forget to cancel your trial in 7 days you will be charged at their regular monthly fee of $79 per month. But this kind of marketing tactic is not new at all...many big and small retailers, including Netflix have used a similar model of internet marketing to generate leads.

In any case, if you're into video editing or post production this offer is really attractive. Even the monthly cost of $79 is quite a decent deal for the amount of stock footage and clips that Video Blocks have on offer. But if you think you're not at the stage where you can afford a recurring cost, just take up their 7-day free trial and remember to cancel before it ends!


Monday, October 01, 2012

6 Frequently Used Transitions Between Shots

Film editing is all about making (mostly smooth) transitions from one shot to another. Here we briefly discuss the 6 frequently used transitions between shots:

1. CUT: The end of the first shot is attached to the beginning of the second shot. The most often used of all transitions, it creates an instantaneous change in one or more of the following: angle, distance, subject etc. In narrative films, normally only cuts are used within a scene.

2. MATCH CUT: A match cut (sometimes called a form cut) maintains continuity between two shots by matching objects with similar shapes or movements or both similar shapes and similar movements. One of the best known examples of a match cut is from 2001: A Space Odyssey (1968), in which a bone slowly tumbling end over end in the air is replaced by an orbiting spacecraft with a similar shape. Watch video below for reference:

3. JUMP CUT: A jump cut is a discontinuous transition between shots. For example, one shot shows a woman running on a beach towards the water, and the next shot shows her running away from the water. A jump cut is sometimes used to surprise or disorient viewers. It may also occur if the film print or video has missing footage. Many filmmakers and film schools associate a jump cut with bad editing.

4. FADE OUT, FADE IN: The first shot fades to darkness, (normally black); then the second shot fades in(by degree goes from darkness to illuminated image). The fade out, fade in can provide a short but meaningful pause between scenes and sequences. If this editing transition is doe slowly, it can serve as a leisurely transition.; if done rapidly, it is less noticeable or not noticeable at all. Perhaps because of the current popularity of fast pacing in films, this transition is used far less often than it used to be,

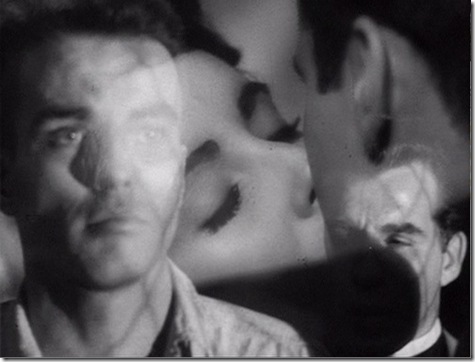
5. LAP DISSOLVE: The first shot fades out as the second shot fades in, overlaps the first, then replaces it entirely. Lap dissolves may be rapid and nearly imperceptible or slow and quite noticeable, creating a momentary superimposition of two images, sometimes suggesting similarities or even meaning.

lap dissolve

6. WIPE: A wipe seems to push one shot off the screen as it replaces it with the next shot. The wipe, which comes with many variations, has been popular in science fiction, serials and action movies. but it has also been used in such diverse films as It Happened on Night, (1934), The Maltese Falcon (1941), The Seven Samurai (1954), Ed Wood (1994) and Battlefield Earth (2000).

Many other transitions are used but much less often than these six mentioned above. We will post more on video editing techniques on the Digital Filmmaking Blog in the coming days,

Sunday, February 05, 2012

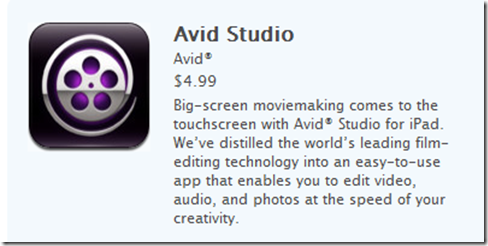
Avid for iPad is here


Avid has launched a new video editing iPad app, which it hopes will give Apple’s iMovie a run for its money, and is Avid’s first prosumer video editing app for the iPad.

avid-ipad

Avid Studio for the iPad enables you to quickly arrange your clips in the Storyboard, make precision edits using the Timeline, and add high-quality transitions, effects, and soundtracks to your movie footage.

Avid has created an app with the power of a professional editor, yet is easy enough for newcomers. It looks to be a big step up from Apple’s iMovie app, which is strictly for home hobbyists.

The Avid Studio app combines a storyboard and timeline interface, where users can arrange clips in the storyboard, then use the timeline for precise cuts. It also offers touch controls not found in the desktop, like the ability to resize and rotate titles with a gesture.

To get media to edit, users can capture video or photos within the app, import media from iTunes, or capture from a camera using the iPad Camera Connection Kit ($29).

More than a basic editor, the Avid app includes picture-in-picture effects, as well as multiple audio tracks for layering sounds. When they’re done, users can upload their creations directly to their YouTube or Facebook accounts, save them to their computers, or send them to their Avid Studio desktop program for further editing.

Other features include 3D animations, transitions, and titles; full title and graphic control; pan-and-zoom for photos; and full screen playback.

Get the Avid for iPad App now:

avid-for-ipad

Friday, June 24, 2011

Final Cut Pro X released

Apple has released Final Cut Pro X, the latest version of its professional video-editing software and one of the most popular programs for digital filmmaking.
Its actually been two days since FCP X was launched, and of course there’s been a strong buzz about it in the market. Video professionals were not only impressed with the new features, but with the new price too. Final Cut Pro X is available in the Mac App Store for $299.99. Compare that to 2009, when the fully loaded Final Cut Studio retailed for $999.99.

Final Cut Pro X is a big update for the powerful editing suite, in no small part because it is now (finally) built with 64-bit support. That means that the app will be able to take advantage of the additional memory space in Mac OS X Snow Leopard and the upcoming Mac OS X Lion.

Installing Final Cut Pro X
Since the only way to get Final Cut Pro X is through the Mac App Store, installation is easy: You just click "Buy" in the store, and the app's icon appears in your Finder, ready to run. You'll be able to install it on five Macs, and you receive updates automatically. The program requires at least a Core 2 Duo-based Mac running Snow Leopard, a decent video processor, 2.4GB of disk space, and 2GB RAM (4GB recommended).


The big new feature is called the Magnetic Timeline, which takes a trackless approach to editing. Like Adobe, Apple has also put a lot of effort into what it calls Content Auto-Analysis, which is another way of saying that the software uses meta-tags to better organize and import content, based on shot type, media format and other information.

Check out this video Apple released to show off the new features in Final Cut Pro X:


Sunday, June 15, 2008

Synchronizing Camera Angles by Timecode in FCP

final cut proIn Final Cut Pro, an alternate way to sync clips of a multi-camera production is to use timecode as a reference. When clips share the same timecode, you don't have to set an In point to sync them together. A timecode number in one clip should identify the same action in an event as that same timecode number in a different clip. The method of switching and cutting angles in the multiclip is the same, no matter how the clips are synchronized.

1. In the Browser, Ctrl-click the Sequences bin and choose New Sequence from the shortcut menu. Name this sequence Timecode, and open it in the Timeline.
Each new sequence you create contains the same PAL settings you chose from the Easy Setup window earlier in this lesson.

2. Hide the contents of the Audio Pops bin, and display the contents of the Timecode bin.

3. Double-click the Gilly_cu clip, and play from the beginning of the clip. When Gilly steps up to the mic to start singing, stop the clip and look at the timecode number in the Current Timecode field in the Viewer.
fcp timecode


4. Open a few other clips from the Timecode bin and compare the timecode numbers at the location where Gilly starts to sing.

The same timecode number in all of these clips identifies the same event or clip location. For this group of clips, you can synchronize by timecode, even though they don't all start or stop on the same frame.

5. To make a multiclip of all the clips in the Timecode bin, Ctrl-click the bin and choose Make Multiclip from the shortcut menu.

6. In the Make Multiclip window, click the Synchronize Using pop-up and choose Timecode as the sync option.
fcp timecode

The blue bars of each angle reposition to align the clips by timecode. Notice how the blue bars seem to cover the same relative area. They were taken from the same portion of the song but are not exactly the same length.

7. Click OK. In the Timecode bin, rename the new multiclip Timecode, and double-click to open it in the Viewer.

8. In the Viewer button bar, click the Show Multiclip Overlays button to toggle off the overlays in this multiclip.
multiclip editing

9. In the Viewer, click the View pop-up and choose Multiclip 9-Up from the pop-up menu to see all the multiclip angles. Play this portion of the music video.
fcp camera angles

10. To edit this multiclip, use the same process you used with the Audio Pops multiclip. Start by changing the sync to Video+Audio and selecting the CD Track - Timecode clip. Then change the sync to Video and select the first video angle. Set an In point and an Out point where the angles are all in view, and edit the multiclip to the Timeline.

11. To see the clips play in the Viewer as you play the sequence, click the Playhead Sync pop-up, and choose Open from the menu, or press Shift-Ctrl-O. This will allow you to see the angles as you play and cut in real-time.

At this point, you can edit these clips as you did in previous exercises: either by moving the playhead to an exact edit location and cutting to a new angle, or by cutting live.

NOTE
If you are using a laptop or slower computer, this nine-clip multiclip may play slowly.
Digital Filmmaking is the way to go...

Thursday, May 22, 2008

Boost for HD Video Editing in Adobe Premiere Pro

MainConcept AG, a wholly owned subsidiary of DivX Inc. and one of the world’s leading providers of video and audio codecs and software development kits (SDK) to the broadcast, film and consumer markets, have announced the release of the updated MainConcept™ MPEG Pro™ HD 3.2 Plug-In for Adobe Pro CS3, providing enhanced support for the editing of high-definition video.

MainConcept’s renowned MPEG Pro HD 3 Plug-In allows the quick and easy editing of MPEG, H.264/AVC, and even native HDV content in the familiar Adobe Premiere Pro workflow without requiring transcoding. The newest MPEG Pro HD 3.2 Plug-In brings frame-accurate, native MPEG editing with smart rendering to Premiere Pro CS3 versions. It includes full support for Adobe Premiere Pro CS3, Dolby Digital, AVC-HD and a wide variety of camcorders, including Sony’s new XDCAM HD 422 series optical disc and XDCAM series solid state camcorder.

“The release of MainConcept MPEG Pro HD 3.2 Plug-In is a significant technology leap for Adobe Premiere Pro CS3 users that adopt Sony’s highly anticipated XDCAM EX and XDCAM HD 422 camcorder,”
said Muzaffer Beygirci, Managing Director and VP sales of MainConcept AG.
“The new plug-in offers high-end features such as MPEG and Dolby Digital support, and will be a must-have for video professionals to import, edit and produce high-quality work using Adobe Premiere Pro.”

The MainConcept MPEG Pro HD 3 plug-in is available for online purchase and instant downloading at the MainConcept website. A free demo version is available for pre-purchase testing.


Source

Sunday, April 06, 2008

10 Basic Avid Tips and tricks


10 Basic Tips and tricks for Avid


1. If you can't play a sequence in Avid, it's often because of corrupt media, so use the binary chop to find where that niggly piece of media is hiding. Mark an in/out on half of your sequence. Press play in-out (usually 6 on most keyboards). If that half plays, then the corrupt media is on the other half. Keep chopping the other half into halves, and you'll very quickly narrow down where the corrupt media is.

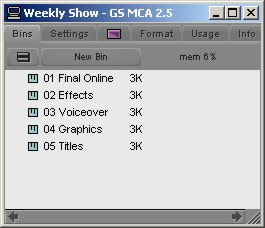
2. If you work on a weekly show, where each show is a project, don't use the same bin names in each project, because you'll often want to open bins from one project in another, and Avid won't allow two bins of the same name in each project.

3. If you want to guarantee that bins will follow a particular order in your project window use a number system before the bin name i.e.


4. Chaning Font Size and Type: Straining to read the text in your bin? Would you like to be able to see the timecode above your Source and Record Monitors better? Hate Geneva (the font, not the city)? It's easy to change the font and/or point size of items in the following places:
- Bins – works one bin at a time unfortunately.
- Composer window
- Timeline
- Project window – version 11.x and later only.

Here's how: just make one of the previously mentioned windows active, then go to the EDIT MENU.
Scroll down the menu to SET FONT and play away.

5. Super Spacer Bar / Trimming Trick: Test out mapping the SOLID PLAY button from the Command Palette (in earlier versions of MC you have to move the play that is on the "5" key) to your space bar. Now the bar becomes not just stop, but play as well while in Composer mode. Even cooler, and more useful: now when you are in Trim Mode and have finished a trim, just hit the space bar and it will loop play.

6. People sometimes get a sync drift (a common problem with Avid and Digibeta) all the time. To easily correct your drift, duplicate your sequence just before you re-conform your video and give it a name like Offline Backup. Hi-res your sequence, and then load your Hi-Res sequence in the record monitor and your lo-res sequence in the source monitor. Click the gang button in either monitor. You can now move through your sequence, checking the shots in your record monitor to see if they line up with the source. If they don't, use the slip & slide buttons (usually m,./) to correct it.

7. Adding Comments to Avid Clips in the Timeline: Did you know it's possible to add clip comments directly to clips within the Avid Timeline? This is important for a few reasons.

#1 The comments will stay embedded within the clip, so if you move the clip, the comments will stay with it.

#2 If you edit a title directly from the timeline, the clip name doesn't change. You can add a clip comment to reflect the real-name of the title template, instead of having to deal with a generic name.

To add comments to clips within Avid Xpress or Avid Media Composer follow these steps:

Highlight one or more of your clips within the Avid timeline using segment mode. In this case, red segment arrow has been turned on to select a clip.


Next, navivate to the pull-down menu in the upper right corner of the Composer Window. Choose add clip comments. A clip comment dialog box will appear. Go ahead and type your comment.


To get the comments to appear in the actual Avid timeline, you need to turn them on using the timeline-fast menu which is located in the bottom left corner of the timeline window.